Ultimate Grids Engine Documentation
Introduction
Thank you for your interest in this package! I’m sure it will serve you well and help you realize your game ideas in Unity!
In case you run into any problems or if you need any help with something related to this package, feel free to contact me by joining the discord server using the button below.
About the Asset
What's the Ultimate Grids Engine?
The Ultimate Grids Engine it’s a framework for grid-based games, which allows you to create grid-based games quickly and effortless.
Among other things it provides you with: entities system, grid based movement, range and path finding algorithms, full level editor which allows you to populate grids with tiles and entities, modular attack system, interactive objects, packed with games and mechanics examples, and a lot more.
Fully supports Rectangle, Hexagon and Isometric grids for both 2D and 3D games.
Where do I start?
Well right now you're reading the documentation which means you're in the right place, it is recommended you read through at least all the way to the "Basic Principles" section. The engine is built with Unity good practices in mind. So if this is not your first Unity project, you’ll probably be ok on your own. And you can always go back here if something’s not clear.
That said, you can use the menu on the left to go to specific sections. This documentation is functional. If you have questions about the code itself, you'll rather have a look at the code’s comments directly, usually they cover most questions you might have.
And if that doesn’t help, you can always join the discord server using the link on the Introduction Section.
How to Install
Introduction
Whatever version of Unity you’re using, remember to always import the asset in an empty project, so the engine’s project settings get properly imported.
This asset relies on a few unity packages to function properly. On import this will very likely cause errors, that’s normal, and easily fixed. It’s all explained here.
Importing the Asset
To import the asset correctly, follow these steps:
- Create a new project from Unity Hub, pick the latest stable version of Unity as your Unity version, and 2D or 3D as the Template.
- Go to the Asset Store window and import the asset (it has to be in an empty project, not an existing one).
- You will be warned that importing the asset will overwrite your current project settings (that’s normal), click on Import.
- Once this is complete, you’ll most likely get a prompt saying “This Unity Package has Package Manager dependencies”. This is also normal, click on “Install/Upgrade”.
- After that you’ll get a list of the contents of the engine, don’t touch anything, and click on Import in the bottom right corner.
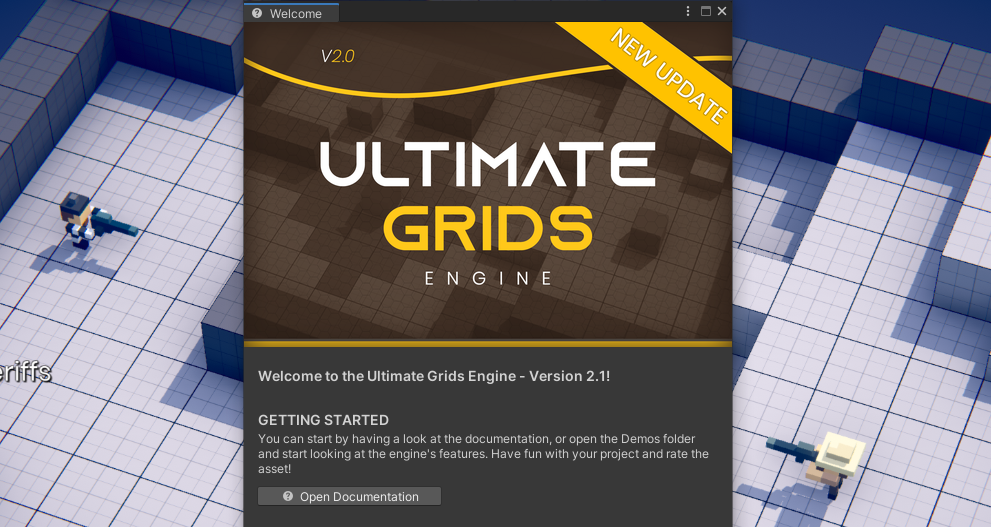
- Import will take a while. Once import is complete, a welcome window should prompt (Fig. bellow) if it shows any dependencies are missing please click on install for each one and you’re ready to use the engine. Have fun!
- In the case you're getting errors on a fresh install follow this last step, else ignore it.
- Go to the Window -> Package Manager.
- Find and install these packages: 2D Tilemap Editor, Post Processing,CineMachine and TextMesh Pro.
Package Structure
The package structure is as follows:
- UltimateGridsEngine
- Common
- Demos
- License.txt
- Readme.txt
To keep everything organized, all package assets are contained in one root folder (’Character Movement
Fundamentals’). This ensures that your project files stay separated from the package’s files.
Inside the root folder, assets are separated by function.
Common
This folder contains all scripts, meshes, animations, materials, fonts and prefabs that don't belong to any specific scene/demo.
- Common
- Animations
- Editor
- Fonts
- Materials
- Models
- PostProfiles
- Prefabs
- Runtime
- Shaders
- Textures
The assets are organized by their use - "Runtime" contains all of the core scripts of the engine, "Editor" contains the editor scripts such as drawers, the welcome window and grid brushes, etc.
Demos
This folder contains all the demos included in the engine. Usually each demo aims at showcasing one or more particular aspects of the engine or how you can achieve different types of games using the engine.
- Demos
- Chess
- Dungeon
- Minimal Hex
- Minimal Rect
- Path Visualizer
- Room Generation
- Sandbox Hex
- Sandbox Rect
- Tactics
"Chess" is a demo chess game, "Dungeon" verby noun game example, "Minimal Hex" minimal scene with the basic settings for a hexagon grid, "Minimal Rect" minimal scene with the basic settings for a rectangle grid with 4 directional movement, "Path Visualizer" demo showcasing the pathfinding algorithm (A*), "Room Generation" a demo showcasing how to add and more tiles and gridobjects at runtime from the script, "Sandbox Hex" basic hexagon level shocasing several features, "Sandbox Rect" basic rectangle level shocasing several features, "Tactics" turn based tactics game example.
Base Concepts
Before gettings started there is a few basic concepts you should understand.
- “GridTiles” in the UltimateGridsEngine is a term used to describe individual tiles/cells that make up a Grid, this means that positions on a grid are not defined by size (say 10x10) but by GridTiles placed in it instead.
- “GridObjects” in the UltimateGridsEngine is a term used to describe any kind of object placed on the grid whether they’re playable characters, or enemies, pickups, interactive objects, NPCs, etc. Anything that moves or interacts with the Grid or other objects in it is considered a GridObject.
Basic Principles
Creating and setting up a new grid
Creating the Grid:
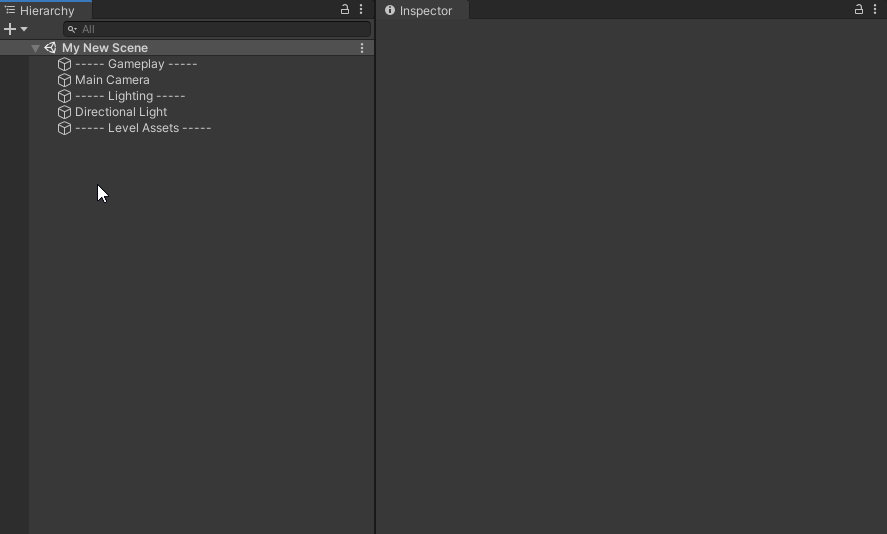
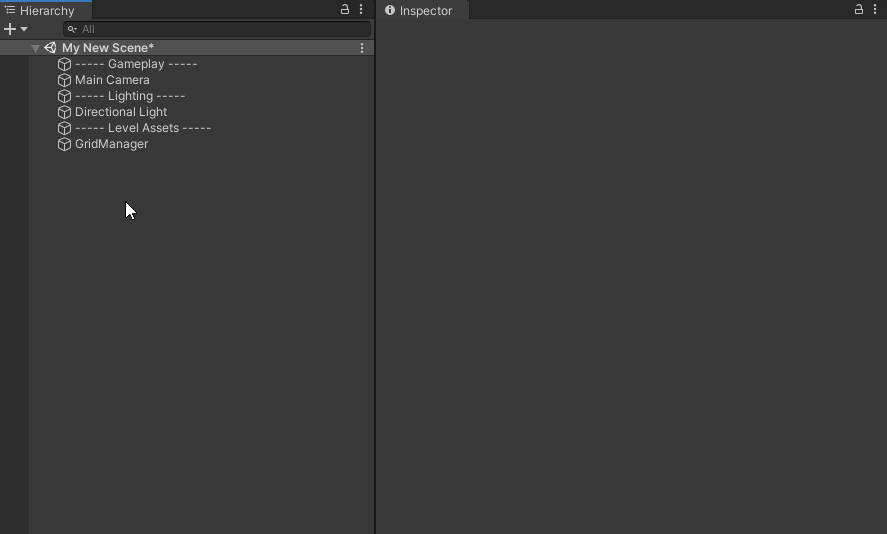
- Start by creating a new empty gameobject on your scene. Rename it to “GridManager”, reset its position and add a GridManager component to it. A Grid component should now be attached to it automatically too.
- Create another new empty gameobject on your scene. Rename it to “PreviewManager”, reset its position and add a PreviewManager component to it. You scene now meets the minimal scene requirements for the engine to work properly.
Setting up the Grid:
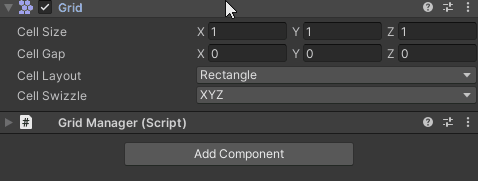
- Now modify the setting of the Grid component to whichever you'll be using in your grid. Here is a small rundown of the parameters, but you can see Unity's Docs for more details on the Grid component.
- Cell Size: its the size in Unity units that each cell occupies in the world.
- Cell Gap: its the size of gaps between cells on the Grid.
- Cell Layout: defines the shape and arrangement of cells on the Grid.
- Cell Swizzle: reorders the XYZ cell coordinates to the option you select for transform conversions. See the Wikipedia article on Swizzling for more details.
- If you are making a Hexagonal Grid make sure to set the X axis of the Cell Size field to 0.8660254 multiplied by the Y axis value. If you want some more info on why you have to do this click here.
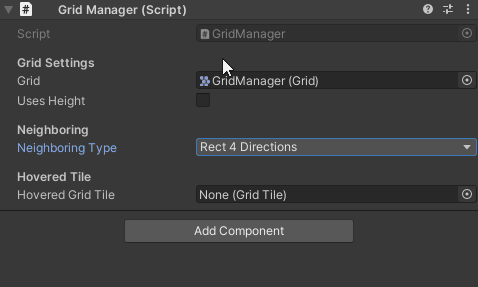
- Now onto the GridManager component, this is the core component of the engine, it handles instantiation, neighbors, keeps track and accommodates tiles and objects on your grid.
- Grid: its the reference to Grid component you'll be using in your scene, unless you're going to use another Grid component which is not the one attached to the GridManager leave it as is.
- Uses Height: whether or not Height will be taken in count when finding neighboring tiles, if true only neighbors with a height of difference of 1 (-1, 0, +1) will be considered neighbors.
- Neighboring Type: defines the neighboring type you'll be using in your grid.
- Rect 4 Directions: this is the default 4 direction neighboring (north, south, east, west) used in rectangle and isometric grids.
- Rect 8 Directions: this is the same as the Rect 4 Directions but also includes diagonal positions (north-east, south-east, south-west, north-west).
- Hexagon Default: this is the default neighboring type for hexagon grids.
- Custom: use this if you'd like to set your own custom neighboring directions, keep in mind these are relative positions so if you'd like to have north/up as a neighboring direction you would use [0,1], south would be [0,-1], etc..
Setting up the Tile Palette
Before creating tiles and adding them to the grid, lets start by setting up the Editor correctly to facilitate things later.
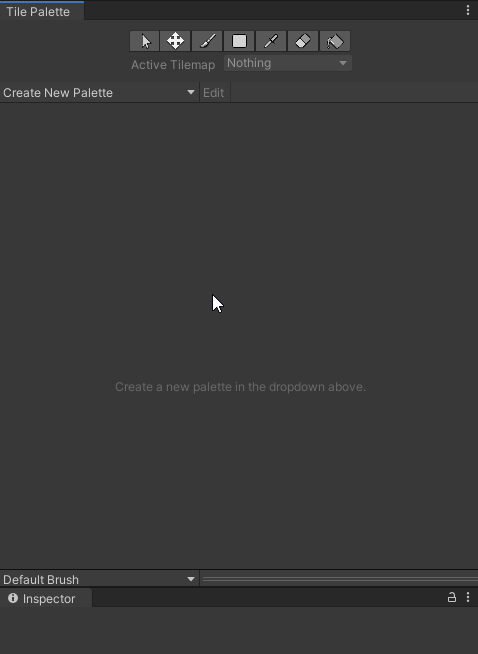
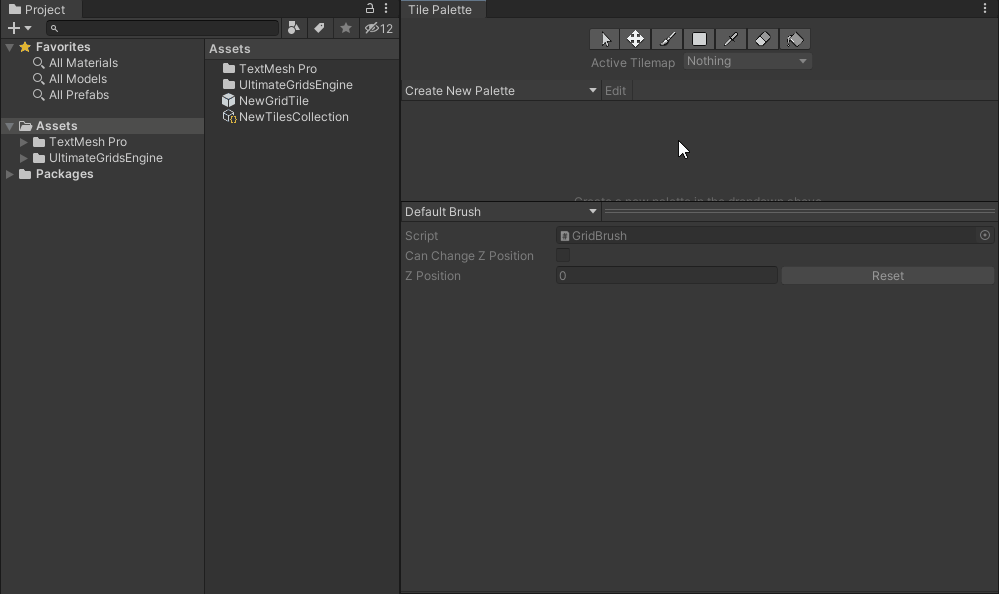
- Go to Window -> 2D -> Tile Palette, and Unity's Tile Palette window will popup.
- Click on Default Brush on the bottom left and you'll see the Brushes Dropdown, on the list you should see UGE's GridTile Brush and UGE's GridObject Brush those are the brushes we'll be using to paint and erase tiles/objects on the grid. Select one of those two and expand the brush editor section as shown in the gif below.
Create a tile and paint it on the Grid
Creating a new Tile:
- Start by creating an empty gameobject in your scene. Ideally you’ll want to separate the components part from the visual part. The best possible hierarchy has the components on the root gameobject and the visual parts (model, sprite, etc) nested on a child gameobject usually named “ModelHolder”.
- On your top level object, add a GridTile component and adjust its settings to your liking, here's a brief rundown on what they do:
- Grid Position: the position that the tile occupies in the grid, if a tile has not being instantiated both the X and Y should be set to 2147483647.
- Tile Height: this is the height of the tile inside the grid, its only used if "Uses Height" is set to true on the GridManager, its used for neighbor finding.
- Is Tile Walkable: this defines whether or not GridObjects will be able to move to this tile's position, for example walls should be tiles with this set to false.
- Grid Objects Pivot Offset: this is the offset position from the center of the tile where GridObjects will be positioned when moving to or occupying this tile.
- Cost of Moving To Tile: this is the cost of moving to this tile, used for pathfinding.
- Manual Neighbors: these are relative grid positions where this tile will try to find neighbors at besides the ones set on the GridManager.
- On your top level object, add a BoxCollider. Adjust its size to match your sprite/model dimensions. This is used for mouse hovering detection.
- Drag the gameobject into the Project Window to turn it into a prefab and delete it from the scene hierarchy.
Creating a Tile Collection:
Now that we have a tile prefab we need to create a tile collection, you can add as many tiles to a collection as you want and you can have as many collections as you want, tile collections allow you to easily pick tiles from it and paint them to the scene.
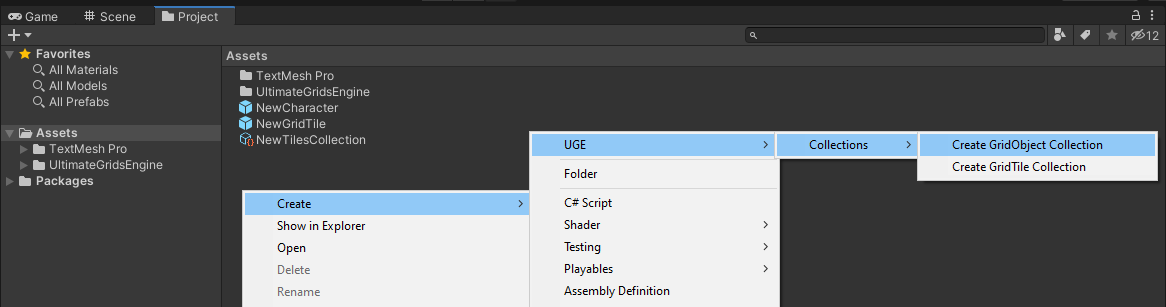
- Right click inside your assets folder in the project window and click Create -> UGE -> Collections -> Create GridTile Collection.
- On the tile palette window select UGE: GridTile Brush from the brush dropdown, then on the Active GridTile Collection Dropdown select the tile collection you created.
- Click the Add GridTile button, drag your tile prefab to the GridTile Prefab field on the window that popped and click Add. Congratulations your has tile now being added to the collection.

Painting tiles on the Grid:
- Select the GridManager gameobject on the scene's hierarchy and make sure that this is the gameobject which shows as the Active Tilemap on the Tile Palette.
- On your Tile Palette window click on the tile you'd like to paint (in this case the one you just added).
- Now you should be able to Paint, Erase and Move tiles on the grid using the Tile Palette's tools.
- You can also modify the selected tile's settings such as Heigh in Grid, Position Offset and Rotation.
Create a character and paint it on the Grid
Creating a new Character:
We'll create a new character which tries to pathfind towards the hovered tile every time you click.
- Start by creating an empty gameobject in your scene. Ideally you’ll want to separate the components part from the visual part. The best possible hierarchy has the components on the root gameobject and the visual parts (model, sprite, etc) nested on a child gameobject usually named “ModelHolder”.
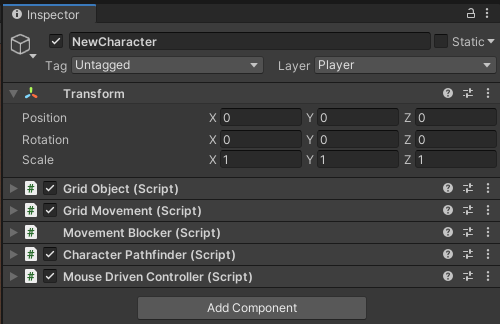
- On your top level object, add the following components:
- GridObject: it handles grid positioning and glues everything together.
- GridMovement: handles the movement of the object, including movement time, cooldown, animations and animation curves.
- MovementBlocker: blocks other GridObjects from moving into your grid position.
- CharacterPathfinder: this component allows the character to pathfind towards a target tile.
- MouseDrivenController: whenever you click it sets a new destination for the CharacterPathfinder component.
- Drag the gameobject into the Project Window to turn it into a prefab and delete it from the scene hierarchy.
Creating a GridObject Collection:
Now that we have a GridObject prefab we need to create a GridObject collection, GridObject collections allow you to easily pick GridObjects from it and paint them to the scene.
- Right click inside your assets folder in the project window and click Create -> UGE -> Collections -> Create GridObject Collection.
- On the tile palette window select UGE: GridObject Brush from the brush dropdown, then on the Active GridObject Collection Dropdown select the GridObject collection you created.
- Click the Add GridObject button, drag your character prefab to the GridObject Prefab field on the window that popped and click Add.

Painting tiles on the Grid:
- Select the GridManager gameobject on the scene's hierarchy and make sure that this is the gameobject which shows as the Active Tilemap on the Tile Palette.
- On your Tile Palette window click on the GridObject you'd like to paint (in this case the one you just added).
- Now you should be able to use the Paint Tool to paint that GridObject on the grid or the Erase tool to erase any GridObject.
- You can also modify the selected GridObject's initial orientation on the editor.
Frequently Asked Questions
How do you instantiate tiles at runtime?
You can instantiate tiles at runtime by calling the method "InstantiateGridTile" on the GridManager, like this: GridManager.Instance.InstantiateGridTile(gridTilePrefab, gridPosition, heightInGrid, offsetPosition, rotation);
How do you instantiate GridObjects at runtime?
You can instantiate tiles at runtime by calling the method "InstantiateGridObject" on the GridManager, like this: GridManager.Instance.InstantiateGridObject(gridObjectPrefab, gridPosition, initialOrientation);
How do you make a character move to another tile or grid position?
To try and make a character move you should call either the "TryToMove" or "TryMoveToPosition" methods on the GridMovement component attached to the character:
-
TryMoveTo(targetGridTile, andAnimate, andRotate, checkMovementCooldown);. -
TryMoveToPosition(targetGridPosition, andAnimate, andRotate, checkMovementCooldown);.
How do you calculate a path?
You can calculate a path by using the "Search" method on the AStar class, passing the start tile and the target tile, it will return a list with the tiles in the path: AStar.Search(startingGridTile, targetGridTile);
How do you use the range algorithm?
It is recommended that you declare a public RangeParameters variable which you can modify in the editor and pass as a parameter when calling the method "SearchByparameters" on the RangeAlgorithms class: RangeAlgorithms.SearchByParameters(startGridtile, rangeParameters)